What is an APPAR ID?
An APPAR ID is a unique identification number designated for students in the JNV system. It holds your academic records and makes it easier to access school-related services. Think of it as your digital badge—it opens doors to information and resources that you need. APAAR ID – a unique 12-digit code will help students to digitally store, manage, and access all their academic credits, including Score card, marksheets, grade sheet, degrees, diplomas, certificates & co-curricular accomplishments. This ID functions as a permanent digital identity for the student in the education ecosystem.

Why Do You Need an APPAR ID?
Having an APPAR ID streamlines your academic journey. You can register for exams, check results, and access various services online. Without it, you might miss out on important notifications or your academic progress. It’s like trying to enter a concert without a ticket—you need that ID!
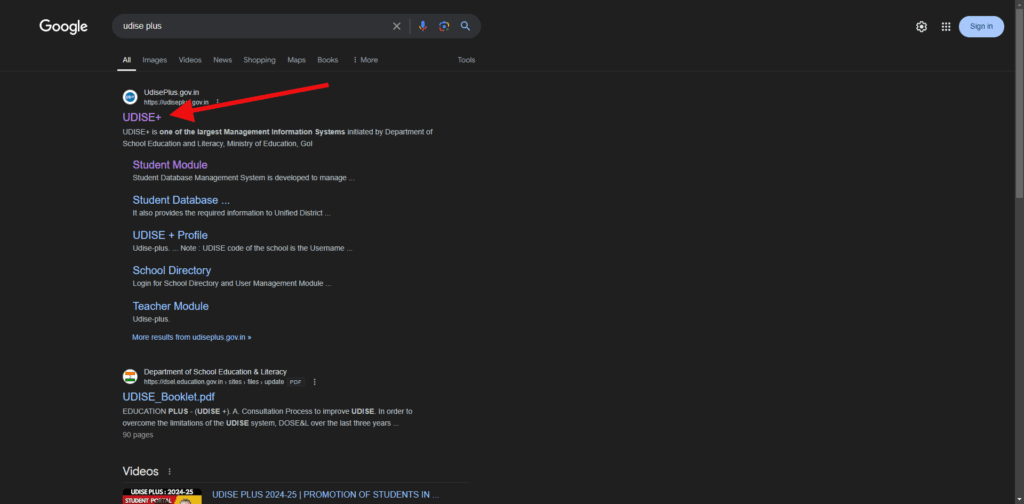
Step 1: Visit UDISE+ Official Website
To kick off the APPAR ID creation process, head over to the official UDISE+ website. This is your starting point. The website is user-friendly and has all the resources you need. Look for the section related to student services, where you will find information on creating your APPAR ID.
Step 2: Login to UDISE+ Official Website
Once on the website, Login to UDISE+ Official Website . Often, it’s clearly marked. Click on it, and you’ll be directed to a new page with instructions. This page will guide you through the process, so keep it handy.
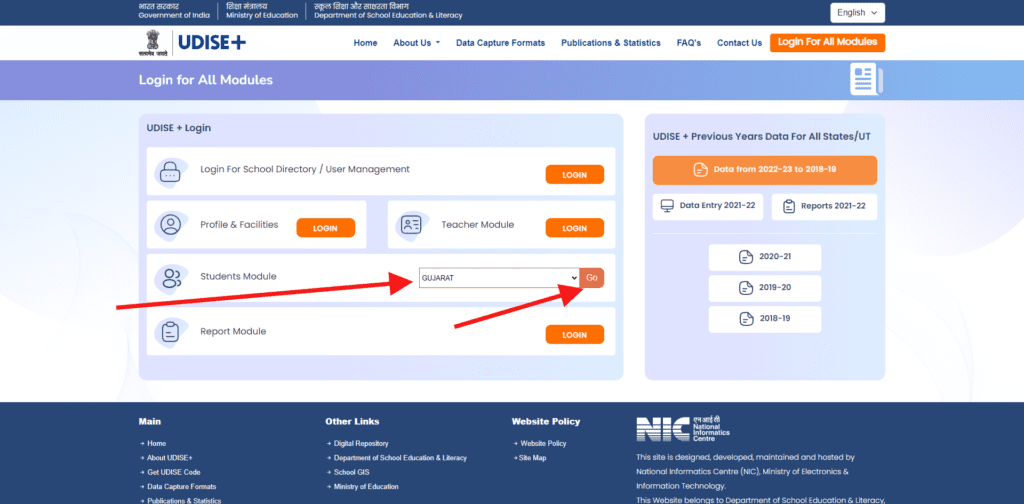
- Click on Login For All Modules
- Click on Select Your State
- Click ON Go.
Step 3: Click On UDISE+ Current Academic Year 2024-25
Once logged in, locate and click on the option or link specifically related to the current academic year (2024-25). This action will direct you to the relevant section or form for data entry, updates or reporting related to the 2024-25 academic year.
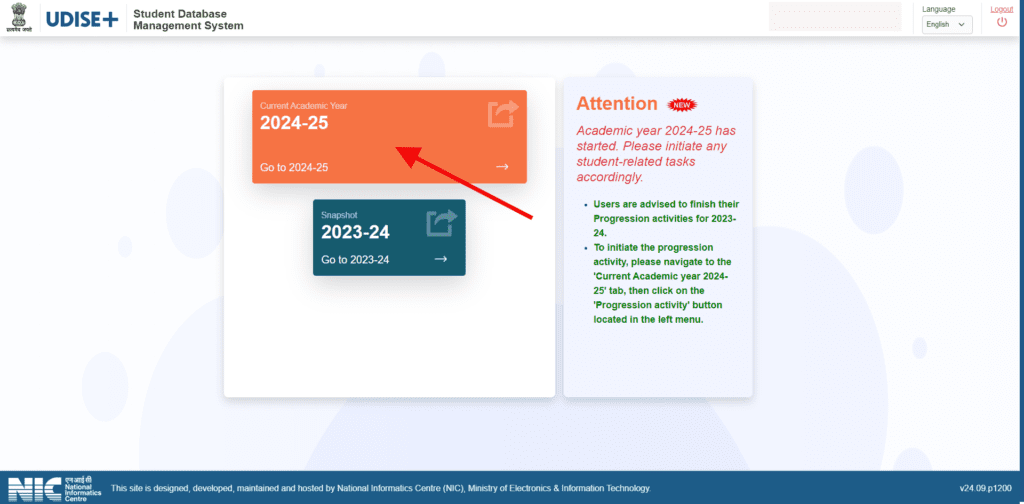
This step is crucial for accessing or updating information specific to the 2024-25 academic year on the UDISE+ portal.
Step 4: Update 2024-25 Information School Information on UDISE+
- Save or submit the updated information.
- Navigate to the “School Information” section.
- Review existing information for accuracy.
- Update any outdated or changed information, such as:
- School name and address.
- Contact details (phone number, email, etc.).
- Infrastructure details (classrooms, labs, etc.).
- Staff and teacher information.
- Enrollment numbers.
- Other relevant school-specific data.
- Ensure all required fields are completed.
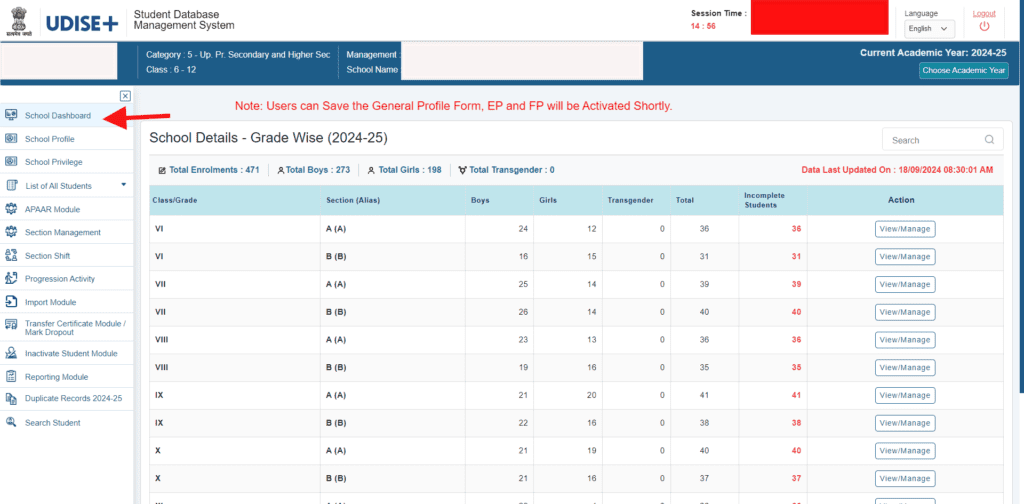
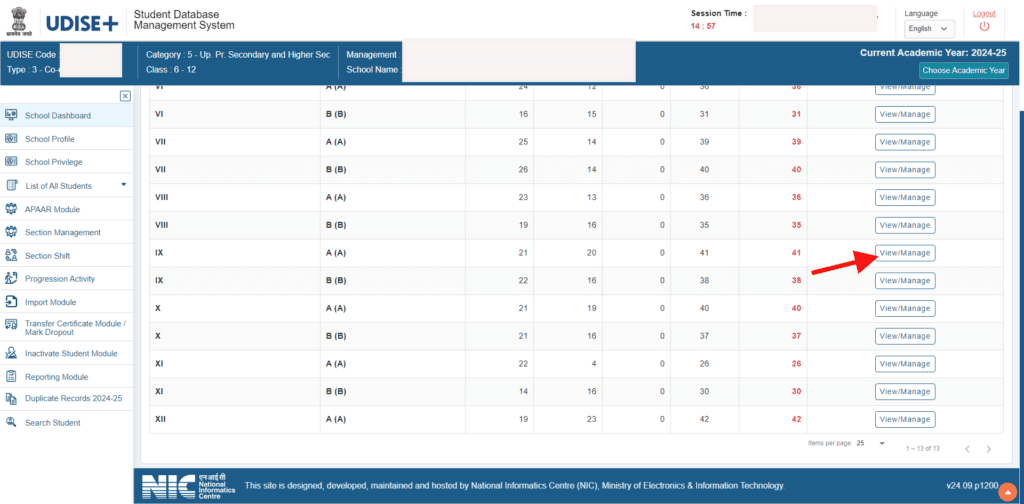
Step 5: Update Students Information On UDISE+ Class Wise – Click on View/Manage Button
- Navigate to the “Student Information” or “Student Data” section.
- Select the academic year (2024-25).
- Choose the class/grade level (e.g., 1-12) for which you want to update student information.
- Click on the “View/Manage” button next to the selected class.
- Review and update student information, including:
- Student name and ID.
- Date of birth.
- Gender.
- Parent/guardian details.
- Attendance and enrollment status.
- Academic performance (if applicable).
- Add new students or edit/remove existing student records as needed.
Ensure all required fields are completed.
By completing this step, users ensure their school’s student data is up-to-date, accurate, and reflected in the UDISE+ database.
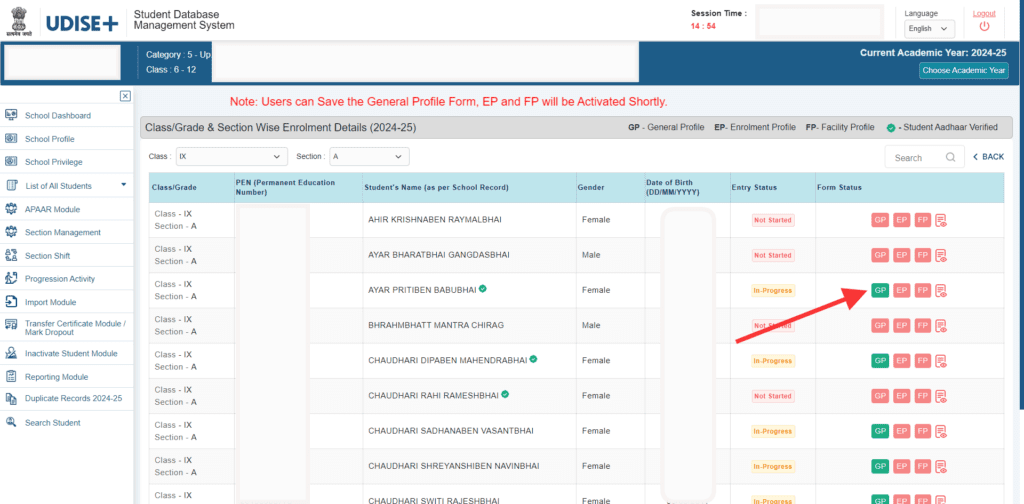
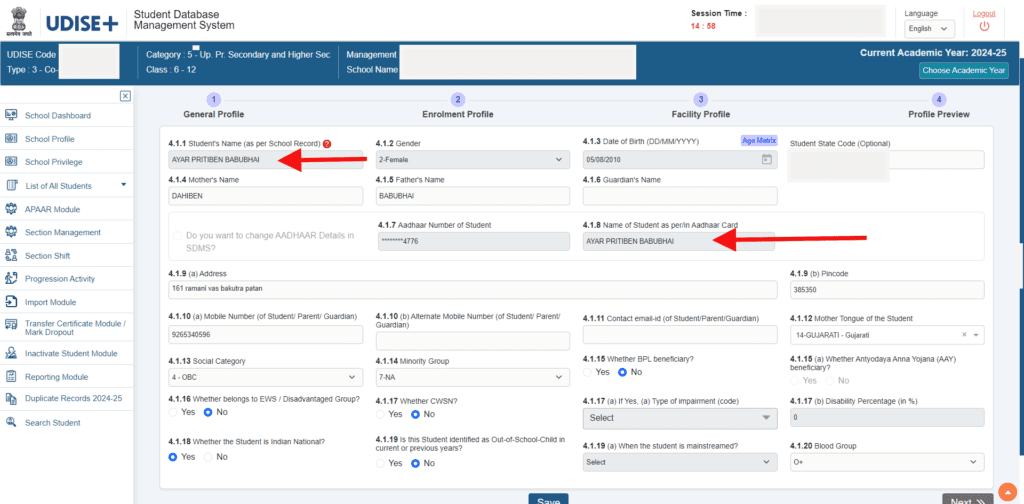
Step 6: Update General Profile (GP) of Students on UDISE+
Update the general profile information of students for the academic year 2024-25.
- Personal details:
- – Name
- – Date of birth
- – Gender
- – Religion
- – Caste/category
- – Disability status
- Family details:
- Parent/guardian name
- Occupation
- Education
- Income
- Contact information:
- Address
- Phone number
- Email (if applicable)
- Academic history:
- Previous school attended
- Class/grade previously completed
- Other relevant details
- Review and verify the updated information.
- Save or submit the changes.
By completing this step, users ensure their school’s student general profile information is up-to-date and accurate in the UDISE+ database.

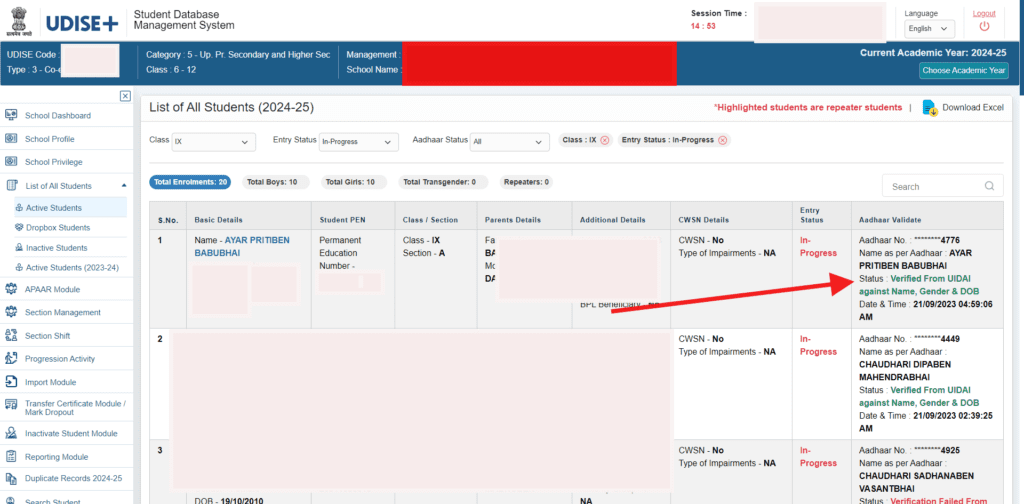
Step 7 : Verify Student Names and Aadhaar Details Check
Students Name (As Per School Record) on General Profile (GP) of Students on UDISE+ Student name spelling and format match exactly.
- Date of birth matches.
- Gender matches.
- Ensure the Aadhaar card number is:
- Entered correctly.
- Valid (12 digits).
- Linked to the correct student.
- Resolve any discrepancies:
- Update the student’s name in the school record or UDISE+ to match the Aadhaar card.
- Correct Aadhaar card number errors.
- Confirm and save the verified information.
Step 8 : Check Status of Aadhaar Validation
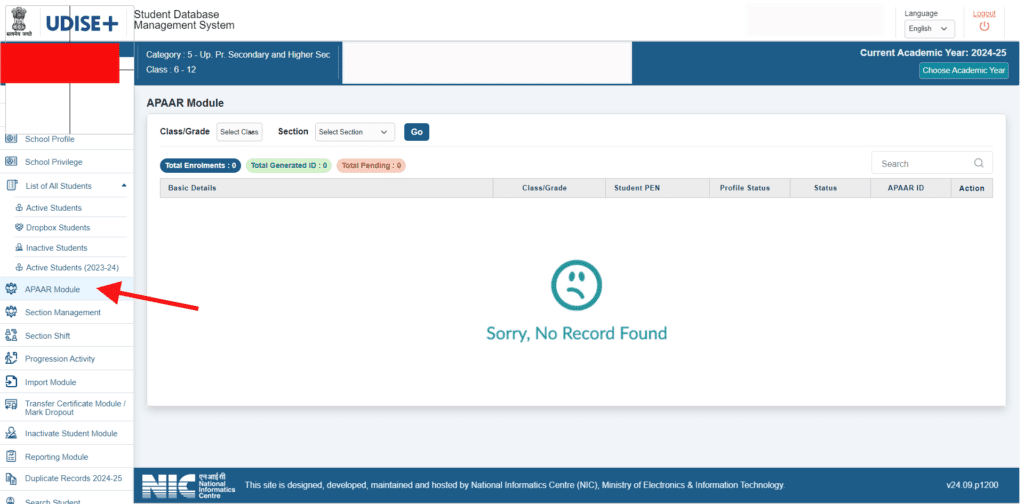
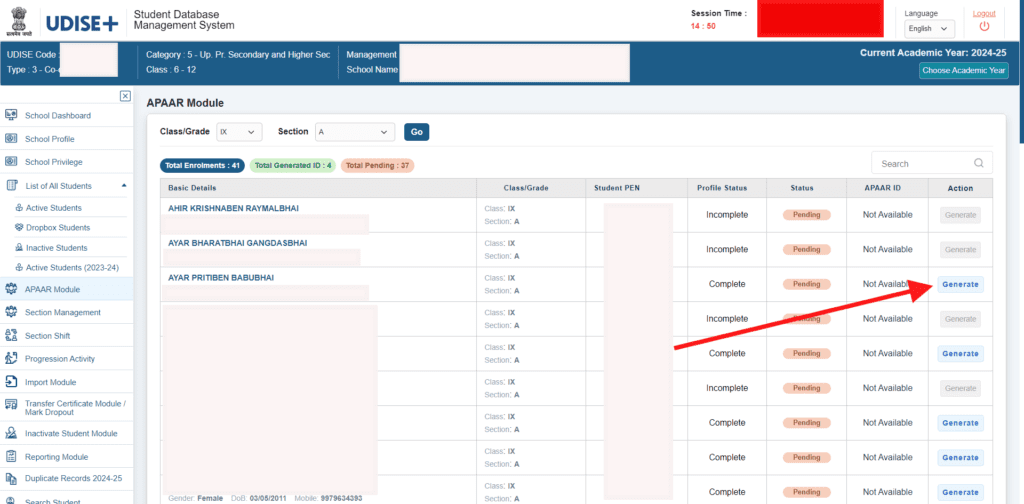
Step 9 : Create a unique APAAR ID for each student.
- Navigate to the “APAAR Module” or “APAAR Reporting” section.
- Click on “Create APAAR ID” or “Generate APAAR Number”.
- Select the academic year (2024-25).
- Choose the class/grade level.
- Enter required student information (e.g., name, Aadhaar number).
- Click “Submit” or “Generate”.
- Note down the generated APAAR ID.
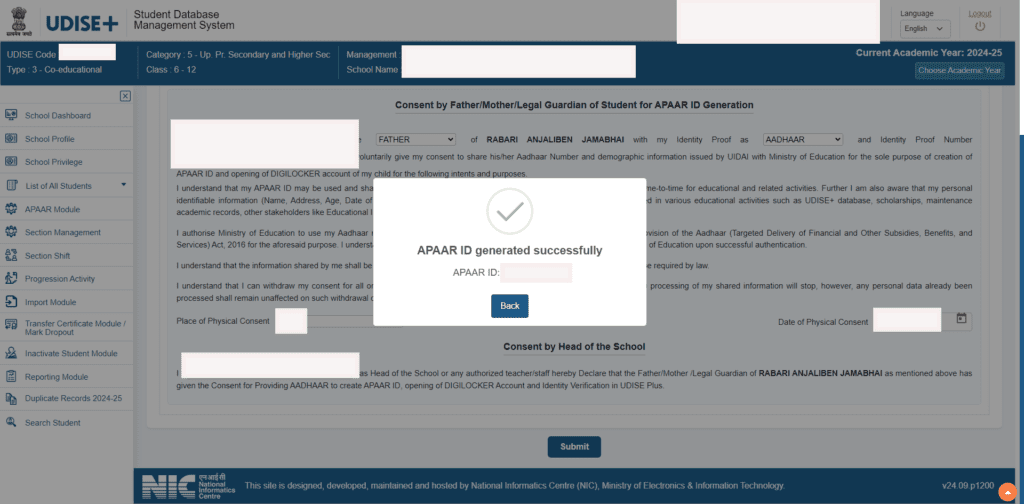
Step 10 : Consent By Father/Mother/Legal Guardian Of Student For APPAR ID Genration
- Obtain a signed consent form from the parent/legal guardian.
- Verify the parent/legal guardian’s identity.
- Confirm their relationship with the student.
- Explain APAAR ID purpose and benefits.
- Ensure understanding of data usage and security.
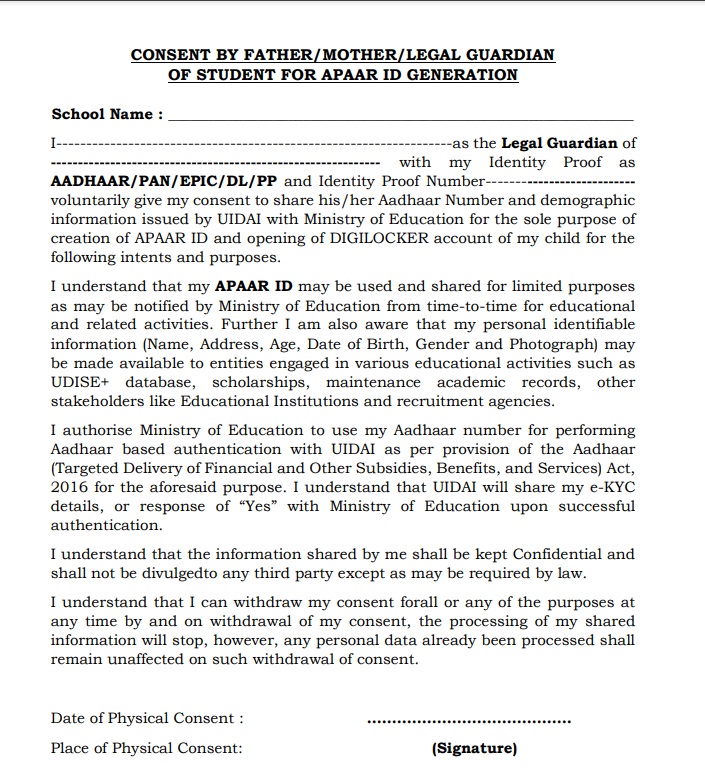
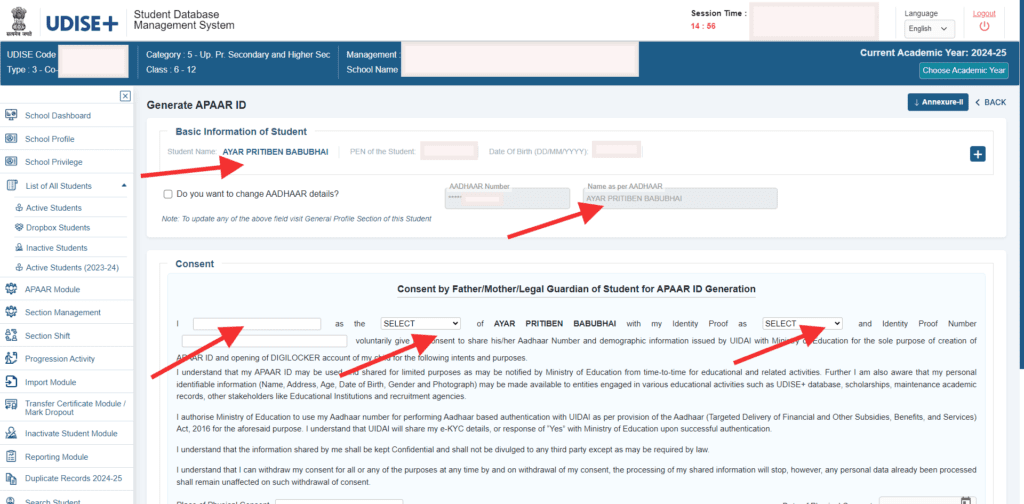
Consent Form Requirements :
- Name and signature of father/mother/legal guardian.
- Student’s name and APAAR ID (if generated).
- Date of consent.
- Declaration of understanding.
Step 11 : Final Step APPAR ID Generation